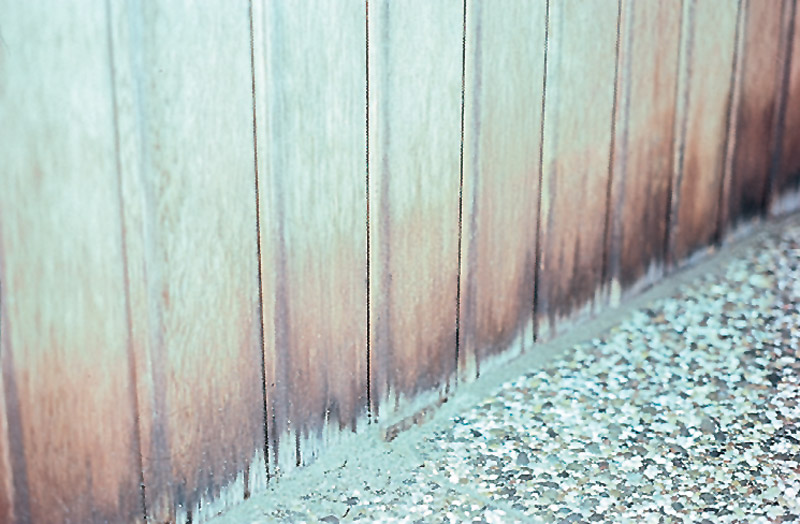
Stain failure at base of timber weatherboard walls
Stain failure at base of stained or clear-finished timber weatherboard walls
Causes
Cladding covered by soil/foliage
The back surface of boards is too close to the ground, not sealed and absorbing moisture
Concrete has been placed up to and against cladding
High subfloor moisture levels behind the cladding
Bottom of cladding is too close to a waterproof deck surface, apron flashing and absorbing moisture
Cause
Cladding covered by soil/foliage
Repair
-
cut back foliage and replace any plants that are likely to regrow and cause the problem to return
-
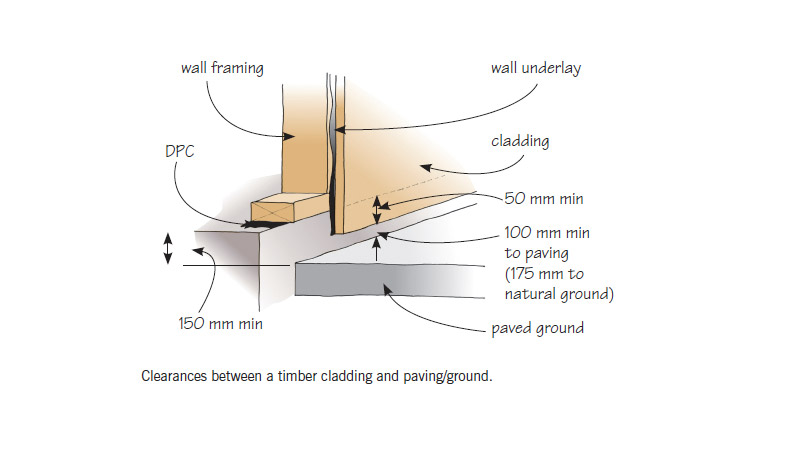
lower the soil level to provide at least a 50 mm gap (preferably more) between the bottom of the cladding and the ground. This is less than the gap required in new construction (which for weatherboard walls is 100 mm above a paved surface or 175 mm above a finished unpaved surface) but could reduce the risk of moisture uptake and allow the boards to dry. The new construction requirements of a 100 mm/175 mm gap should be used if possible
-
check for rot in the timber cladding with a screwdriver. Try to push it into the timber – if the screwdriver easily enters the timber, then the timber is rotten
-
assuming wall framing and wall underlay (if present) are sound and insulation (if present) is dry, replace all rotten timber boards with new weatherboards to match. Treat all exposed timber cuts with a paint-on preservative. Leave at least a 50 mm gap (preferably more) between weatherboards and the ground to prevent moisture uptake
-
where framing is damaged, engage a registered building surveyor to advise on the cause, extent and repair options
-
where timber is good, allow it to dry out completely. Scrape off loose stain and sand the bare timber until the surface is sound. Seal the timber – especially the edges – and recoat.
Cause
The back surface of boards is too close to the ground, not sealed and absorbing moisture
Repair
-
ensure there is at least at least a 50 mm gap (preferably more) between the bottom of the cladding and the ground. This is less than the gap required in new construction (which for weatherboard walls is 100 mm above a paved surface or 175 mm above a finished unpaved surface) but could reduce the risk of moisture uptake and allow the boards to dry. The new construction requirements of a 100 mm/175 mm gap should be used if possible
-
check for rot in the timber cladding with a screwdriver. Try to push it into the timber – if the screwdriver easily enters the timber, then the timber is rotten
-
assuming wall framing and wall underlay (if present) are sound and insulation (if present) is dry, replace all rotten timber boards with new weatherboards to match. Treat all exposed timber cuts with a paint-on preservative. Leave at least a 50 mm gap (preferably more) between weatherboards and the ground to prevent moisture uptake
-
where framing is damaged, engage a registered building surveyor to advise on the cause, extent and repair options
-
where timber is good, allow it to dry out completely. Scrape off loose stain and sand the bare timber until the surface is sound. Seal the timber – especially the edges – and recoat.
Cause
Concrete has been placed up to and against cladding
Repair
-
break up and remove concrete or paving. Reform the ground surface so rainwater will flow away from the building
-
check for rot in the timber cladding with a screwdriver. Try to push it into the timber – if the screwdriver easily enters the timber, then the timber is rotten
-
assuming wall framing and wall underlay (if present) are sound and insulation (if present) is dry, replace all rotten timber boards with new weatherboards to match. Treat all exposed timber cuts with a paint-on preservative. Leave at least a 50 mm gap (preferably more) between weatherboards and the ground to prevent moisture uptake
-
where framing is damaged, engage a registered building surveyor to advise on the cause, extent and repair options
-
where timber is good, allow it to dry out completely. Scrape off loose stain and sand the bare timber until the surface is sound. Seal the timber – especially the edges – and recoat.
Cause
High subfloor moisture levels behind the cladding
Repair
-
reduce subfloor moisture levels:
-
if there is a leak under the house, identify the source and location. Make a permanent repair, or call a licensed or certifying plumber (work on waste pipes must by law be carried out by a licensed or certifying plumber)
-
if surface water is running under the house, divert it away by lowering the ground levels around the building and sloping the ground away from the house
-
clear away obstructions around the house perimeter such as planting or soil build-up outside the vents
-
for painted vents or grilles, remove paint build-up that may reduce the air path space
-
clear away items stored under the house to improve air flow
-
ensure there is not less than 3500 mm² of clear open subfloor venting (grilles or gaps between baseboards) for every 1 m² of floor area
-
make ventilation openings high in the subfloor space, near to the underside of bearers
-
spread vents evenly around the building perimeter to allow cross-ventilation.
-
check for rot in the timber cladding with a screwdriver. Try to push it into the timber – if the screwdriver easily enters the timber, then the timber is rotten
-
assuming wall framing and wall underlay (if present) are sound and insulation (if present) is dry, replace all rotten timber boards with new weatherboards to match. Treat all exposed timber cuts with a paint-on preservative. Leave at least a 50 mm gap (preferably more) between weatherboards and the ground to prevent moisture uptake
-
where framing is damaged, engage a registered building surveyor to advise on the cause, extent and repair options
-
where timber is good, allow it to dry out completely. Scrape off loose stain and sand the bare timber until the surface is sound. Seal the timber – especially the edges – and recoat.
Cause
Bottom of cladding is too close to a waterproof deck surface, apron flashing and absorbing moisture
Repair
-
check for rot in the timber cladding with a screwdriver. Try to push it into the timber and if the screwdriver easily enters the timber, then the timber is rotten
-
assuming wall framing and wall underlay (if present) are sound and insulation (if present) is dry, replace all rotten timber boards with treated timber to match. (Cut back the timber at least 1m past the last visible sign of rot.) Treat all exposed timber cuts with a paint-on preservative. Leave a minimum 35 mm gap from base of cladding to the waterproof deck surface to prevent moisture uptake. (A bigger gap is better but that also requires a higher membrane upstand behind the cladding.)
-
where framing or decking is damaged, engage a registered building surveyor to advise on the cause, extent and repair options
-
where timber is good, allow it to dry out completely. Scrape off loose stain and sand the bare timber until the surface is sound. Seal the timber – especially the edges – and recoat.
Related Maintenance Guides
-
Weathertight Guide
If your home has any of these design features, it may be a leaky building...


Maintenance Charts
-
Maintenance Schedule
A regular maintenance checklist includes checking the condition of certain building elements every year (or...

-
Stain Removal Guide
The best approach is to act quickly when you see a stain, before it has...
